
How to Search Scanned PDFs Offline on Windows
Search scanned PDFs locally in OriginPage. Try three downloadable scans, inspect real OCR omissions, approve or exclude pages, and verify what becomes searchable.
To search a scanned PDF offline on Windows, first recognize its text locally, check that text against the page, and index only the pages you can rely on. In OriginPage, import the PDF, approve or exclude each page requiring OCR review, choose Finish review, and wait for Ready. Then use Search to find a phrase or identifier and open the matching passage.
The review step matters. In our three-page exercise, the clean scan retained its instructions. The skewed scan lost two complete sentences. The poor-quality scan lost a collection condition and garbled its footer. All three produced text; only one was suitable for this review.
This walkthrough shows that actual run in OriginPage 1.0.35.0. You can download the same fictional PDF and compare your results. It is a worked example, not a general OCR accuracy score.
Download three scans you can check
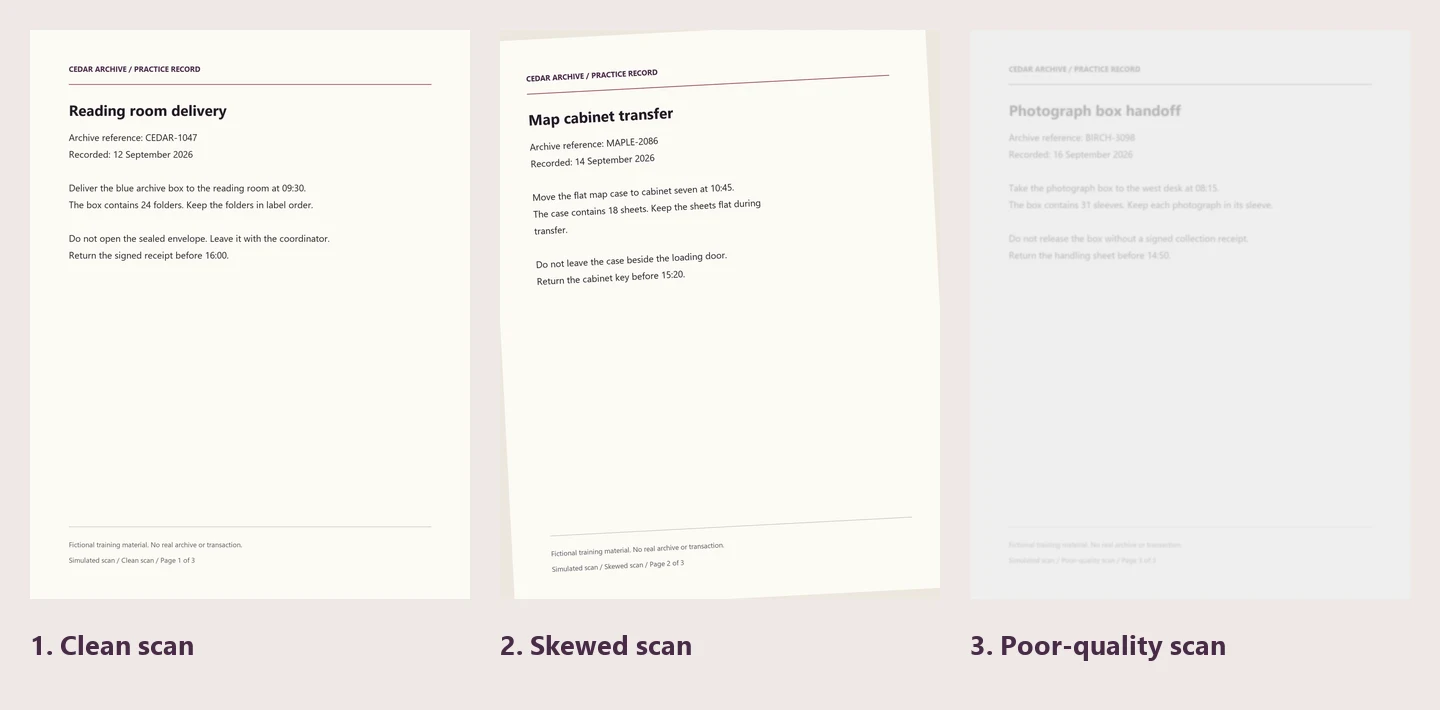
Download the Cedar Archive scans3 fictional, image-only pages · clean, skewed, and poor quality DownloadKeep the ground-truth transcript open separately for comparison. Do not import the transcript into the exercise Workspace: otherwise a search could find the answer key instead of recognized scan text.
The pages are simulated scans generated from fictional archive instructions. They are not photographs of real records. Each PDF page contains an image and no hidden searchable text layer.
| Page | Scan condition | Distinctive reference | What to check |
|---|---|---|---|
| 1 | Clean, upright, 200 pixels per inch | CEDAR-1047 |
24 folders, 09:30 delivery, sealed-envelope instruction, 16:00 receipt deadline |
| 2 | 200 pixels per inch, rotated three degrees | MAPLE-2086 |
18 sheets, 10:45 transfer, loading-door instruction, 15:20 key deadline |
| 3 | About 65 pixels per inch, blurred and low contrast | BIRCH-3098 |
31 sleeves, 08:15 handoff, signed-receipt condition, 14:50 handling-sheet deadline |
Why Ctrl+F cannot always find visible words
A PDF can display an image of a sentence without containing that sentence as text. A viewer can draw the page perfectly while having nothing for its Find command to match. OCR, short for optical character recognition, attempts to turn those pixels into characters.
An unsuccessful search alone does not diagnose a scan. A PDF may also contain a faulty text layer, unusual character encoding, or words split across lines. Try selecting and copying a short sentence, then inspect what the document tool extracted. The five-minute PDF-reading test covers mixed files with selectable text, scans, and columns.
This exercise removes that ambiguity: all three pages are image-only. OriginPage must recognize their text before it can make their contents searchable. It retains the original source separately from the text used for search.
Step 1: import the PDF into its own Workspace
Use an installed OriginPage build on Windows 11 x64. The current workflow supports English OCR in supported, unencrypted PDFs. The limit is 100 pages requiring OCR in one PDF; see what OriginPage supports for the complete size and operating limits.
Create a Workspace named Cedar Archive OCR walkthrough. Select Add documents, choose cedar-archive-scans.pdf, and let processing finish. Import only that PDF for this exercise.
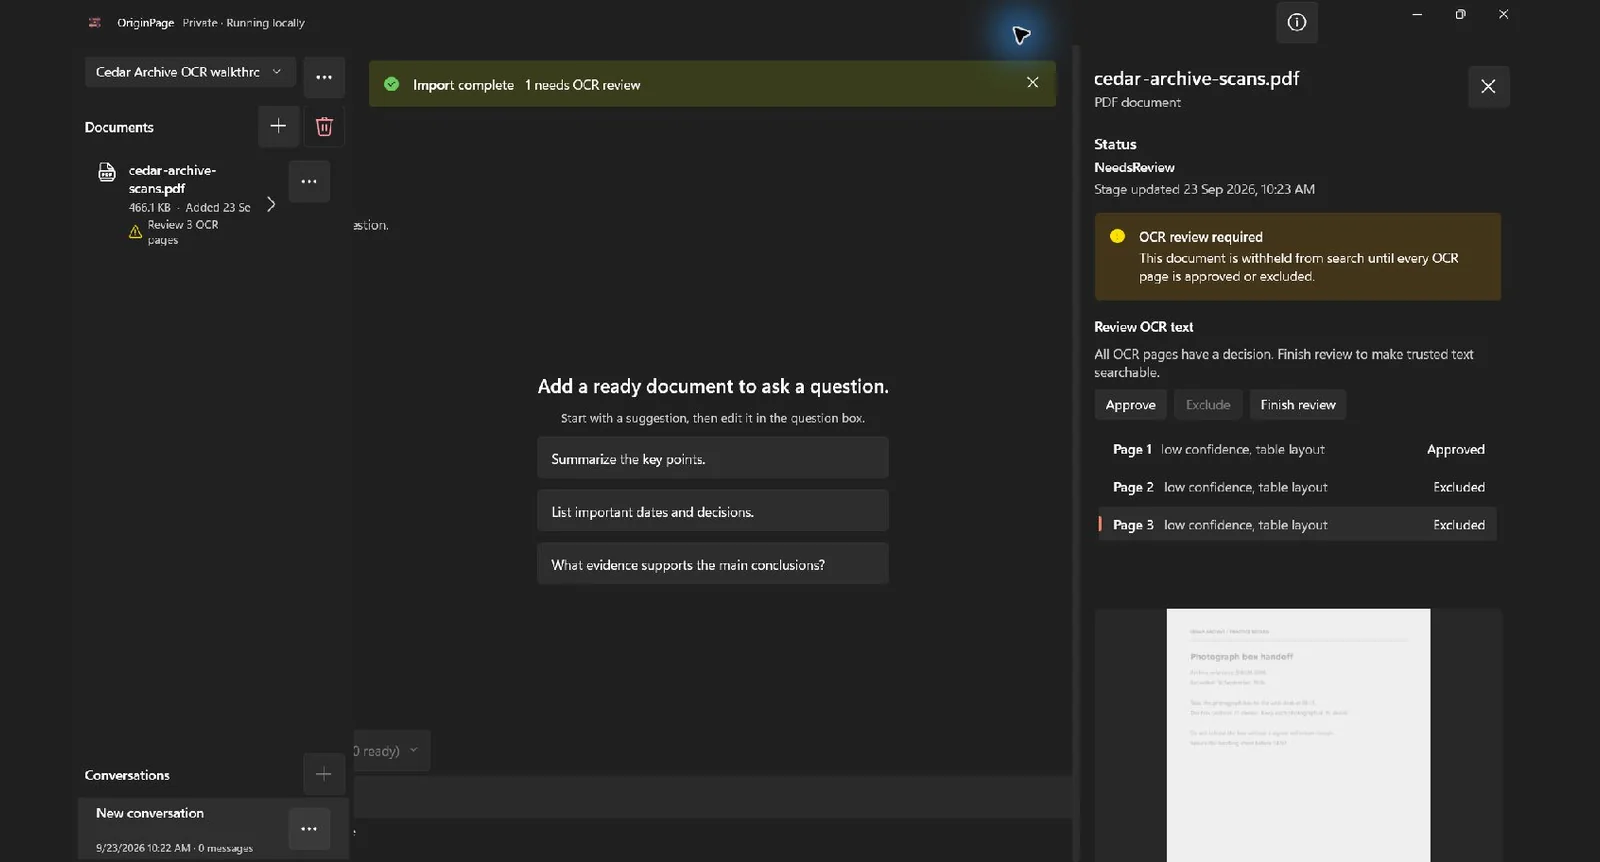
Our import reported Review 3 OCR pages. Opening the document showed NeedsReview and explained that the document was withheld from search until every OCR page had an approval or exclusion decision. Having a filename in the sidebar is not the same as having searchable content.
OriginPage creates a managed copy. It does not add a text layer to your original PDF or turn this workflow into a searchable-PDF export. The result we are building is a searchable document inside OriginPage.
Step 2: inspect the clean page before approving it
Open the document’s details, find Review OCR text, and select Page 1. Scroll within the details pane to compare the page preview with the recognized text. Open the downloaded PDF separately when you need a larger view of the original.
Read the whole short record. Check the identifier, numbers, times, and instructions, including the word not. For this page, our recognized text preserved CEDAR-1047, 24 folders, 09:30, the sealed-envelope restriction, and the 16:00 receipt deadline. We approved it after comparison.
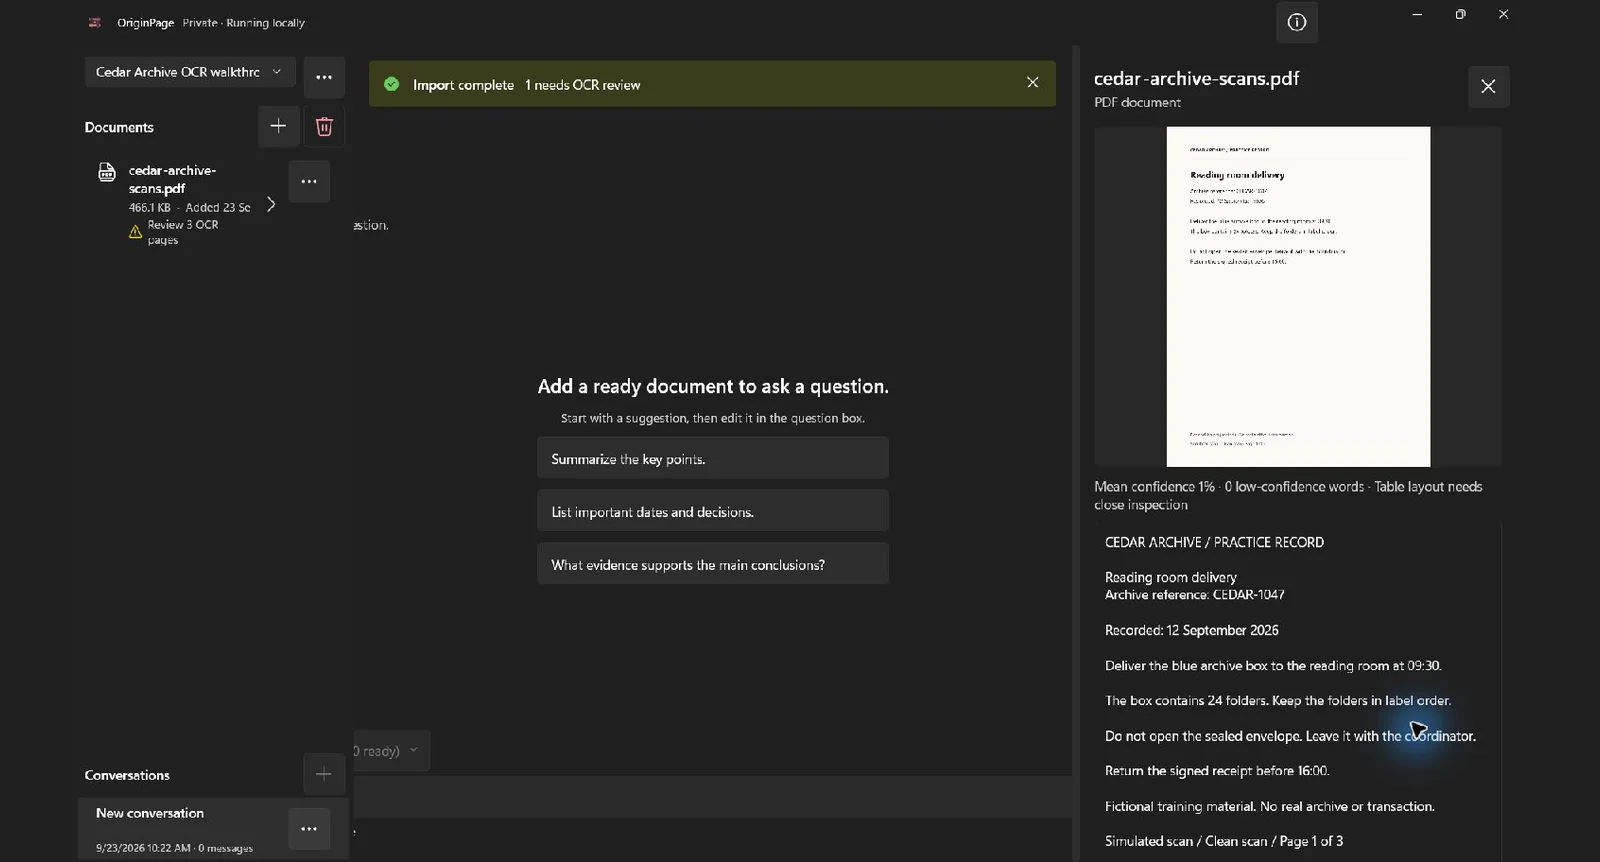
Do not interpret a confidence percentage as the percentage of correct words. In this run, the same displayed mean appeared on pages with quite different outcomes. A warning tells you to inspect the text; it cannot establish whether a deadline or condition survived. These practice pages have no data table, despite the displayed layout warning.
Step 3: check the skewed page for missing sentences
Select Page 2 and compare the recognized text with the original. Our result retained MAPLE-2086, the date, 10:45, and the instruction about keeping 18 sheets flat.
But it omitted both of these source sentences:
Do not leave the case beside the loading door.
Return the cabinet key before 15:20.
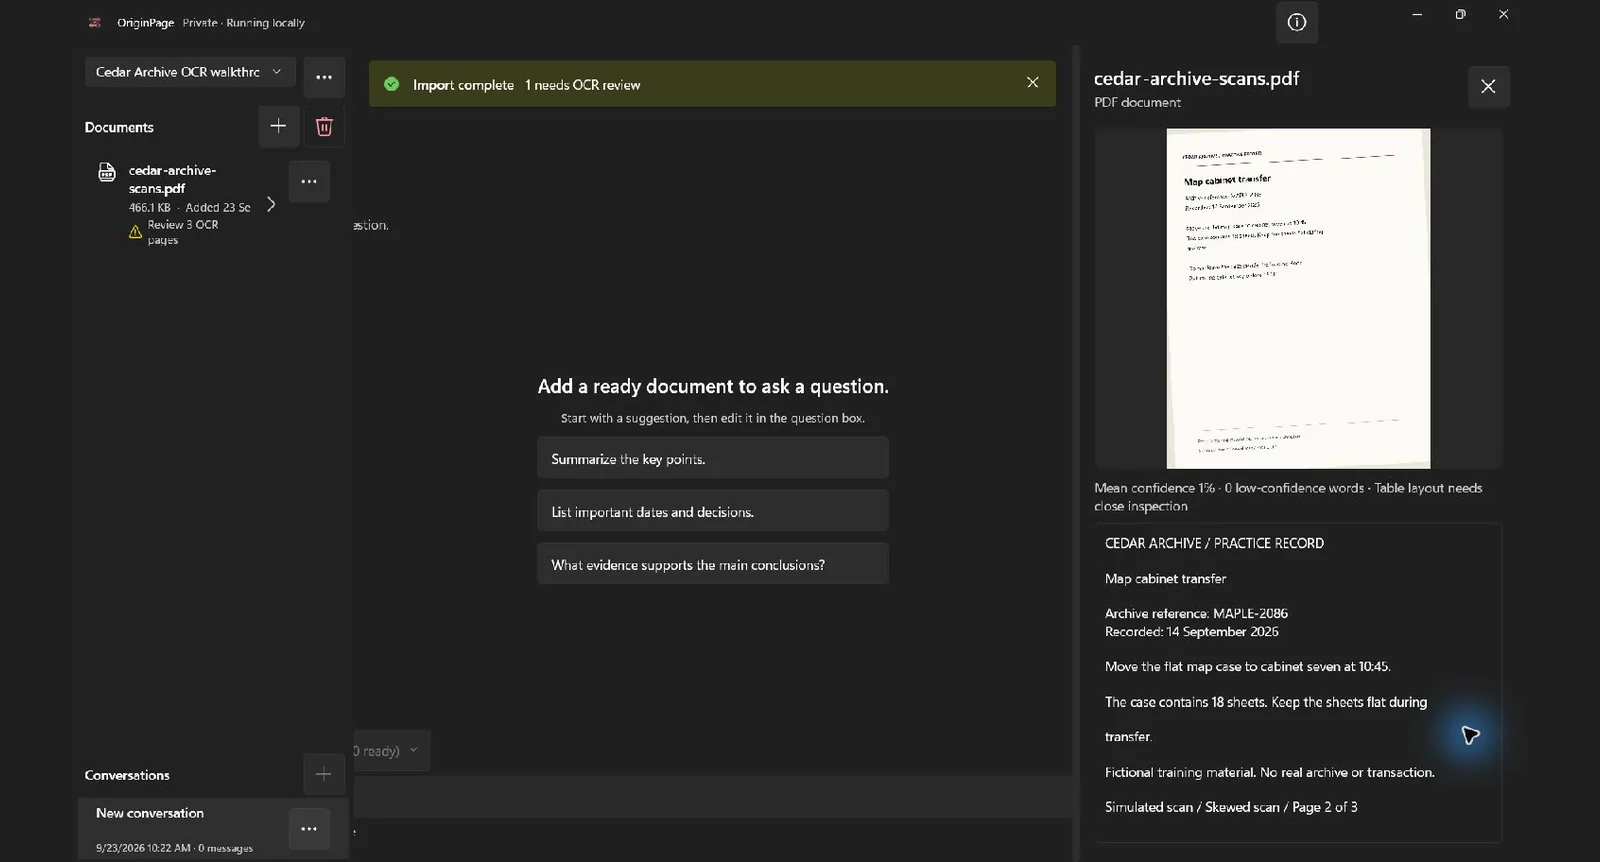
This is why searching for one known code is only a spot check. It would not expose those omissions. If the task includes handling restrictions or return deadlines, the recognized record is incomplete even though its heading and identifier look right.
Choose Exclude for this observed result. That is our reviewer decision based on missing instructions, not an automatic rejection caused by the page’s tilt. Your OCR output may differ; inspect it before deciding.
Step 4: inspect the poor-quality page
On Page 3, our recognized text kept several useful details: the photograph box, 31 sleeves, 08:15, and the 14:50 handling-sheet deadline. It also inserted a space in the reference, displaying BIRCH- 3098, and garbled words in the footer.
The more consequential error was an omission. The source says:
Do not release the box without a signed collection receipt.
That sentence was missing from the recognized text. We excluded this page too.
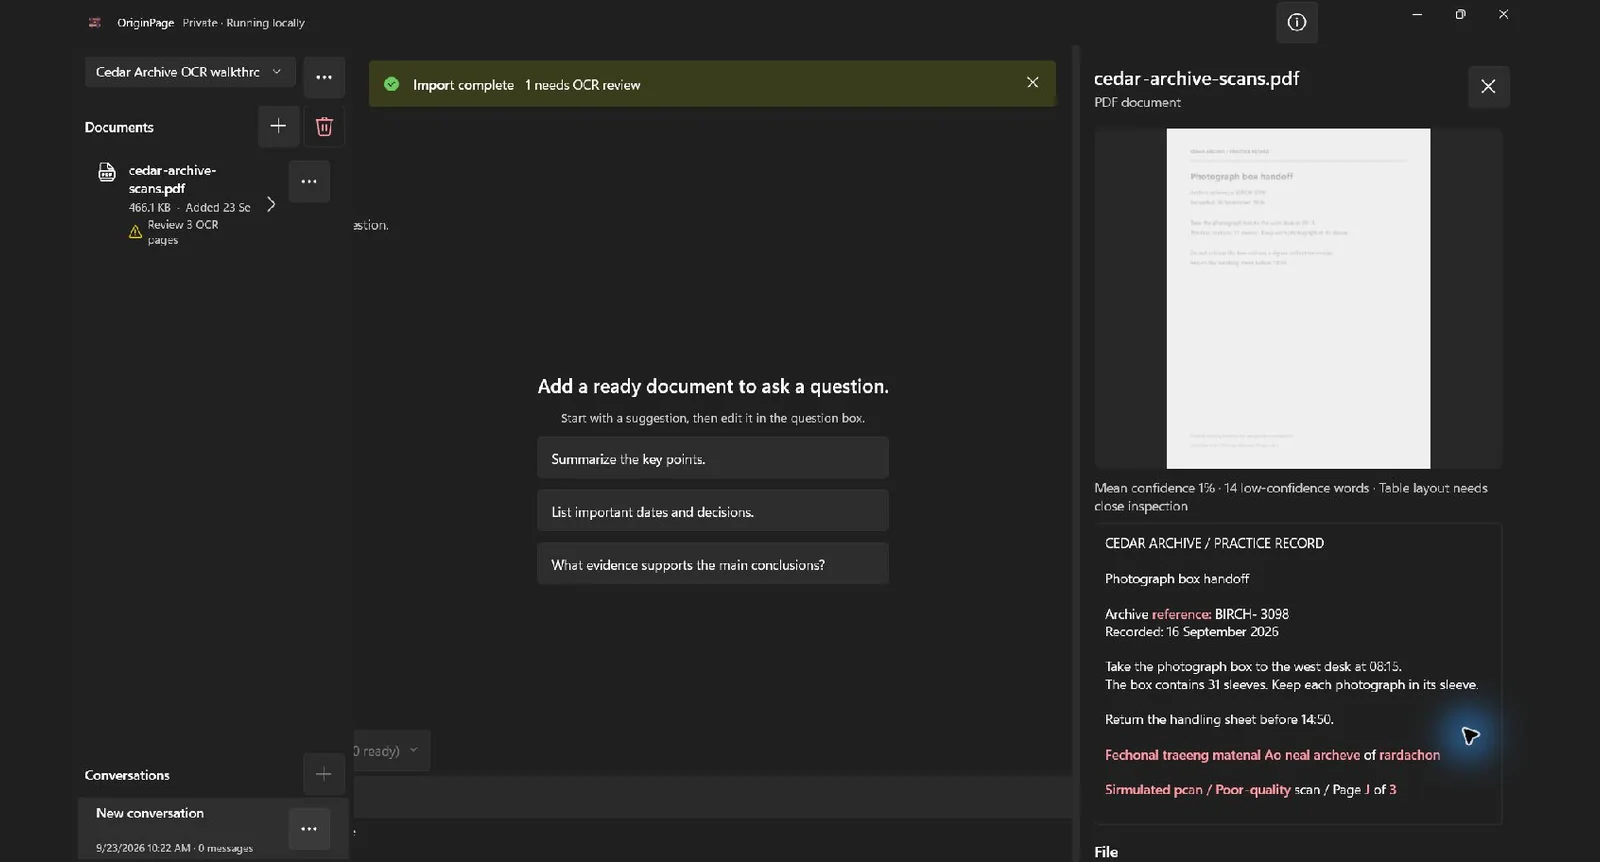
Review for missing content as well as incorrect characters. A paragraph that disappears completely can be less conspicuous than a visibly misspelled word.
The observed decisions were:
| Page | Material finding | Decision |
|---|---|---|
| Clean | Inspected content retained | Approve |
| Skewed | Loading-door instruction and 15:20 deadline missing | Exclude |
| Poor quality | Signed-receipt condition missing; reference spacing and footer errors | Exclude |
These pages have different source text as well as different image quality. The exercise demonstrates review decisions; it does not isolate the effect of resolution or rotation in a controlled comparison.
Step 5: finish review and inspect what became searchable
Every required page needs a decision. Approve accepts the page’s recognized text; Exclude withholds that page’s text from the trusted index. Neither action fixes its wording.
Choose Finish review and wait for Ready. In our run, document details then showed 448 characters and one passage. Its extracted-text view contained page 1. The document still had three original pages; approval had not turned the other two into searchable evidence.
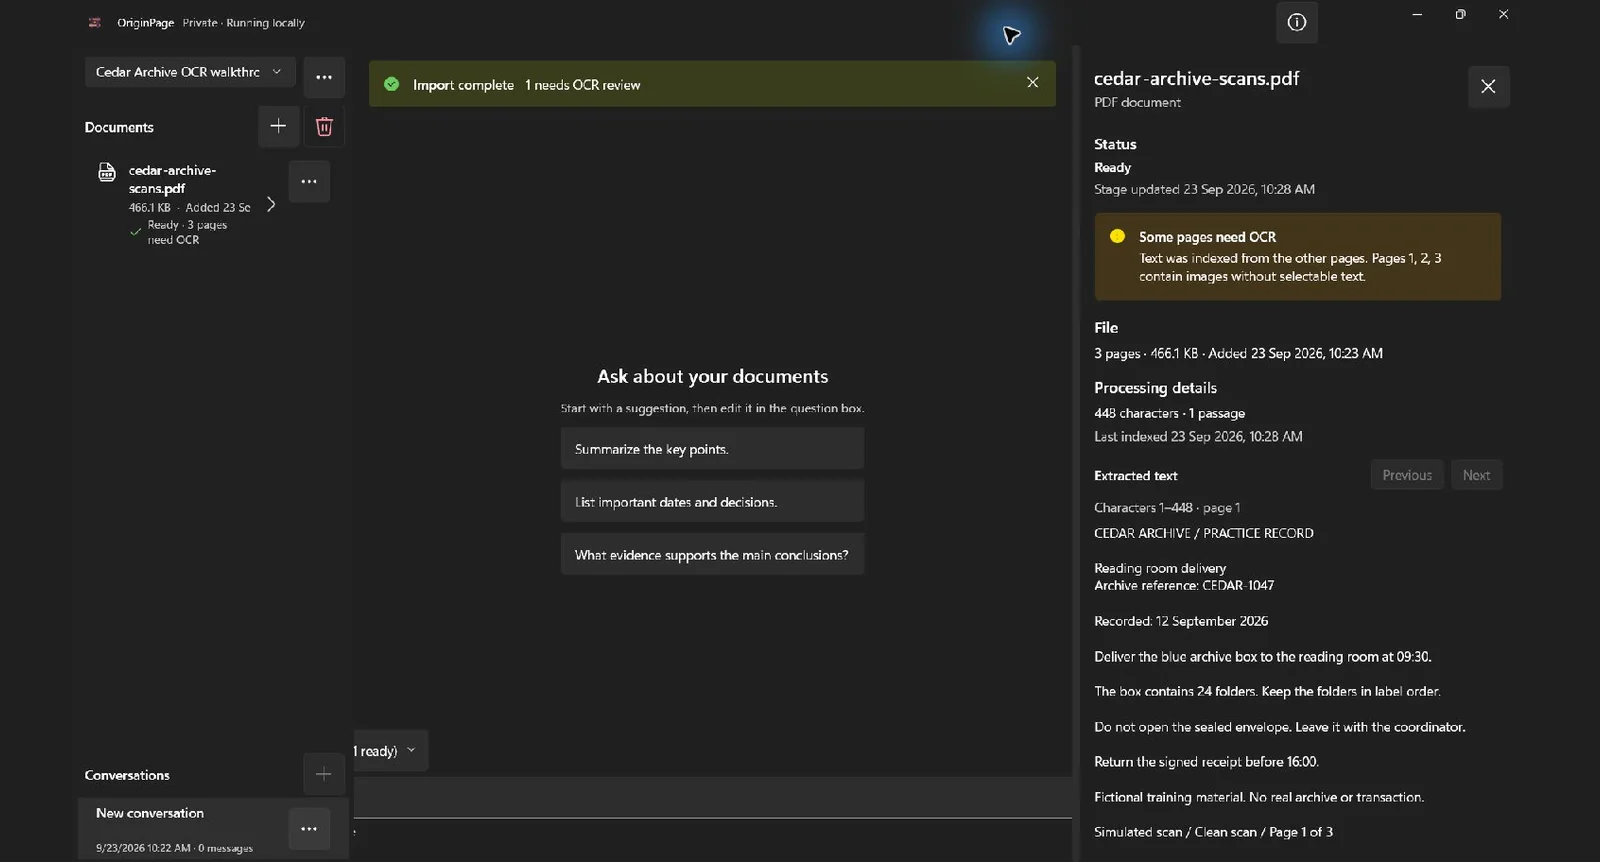
Ready means the ingestion workflow finished. It does not mean every original page contributed text, nor does it certify recognition accuracy. If you exclude every page of an image-only document, no approved text remains to search.
Step 6: search the approved page and open its context
Close document details and open Search. Choose Exact phrase, leave File set to All documents, and enter CEDAR-1047 without quotation marks. Select Search, or press Enter. With only the sample PDF in this Workspace, the search boundary is easy to inspect.
Our query returned one result on page 1.
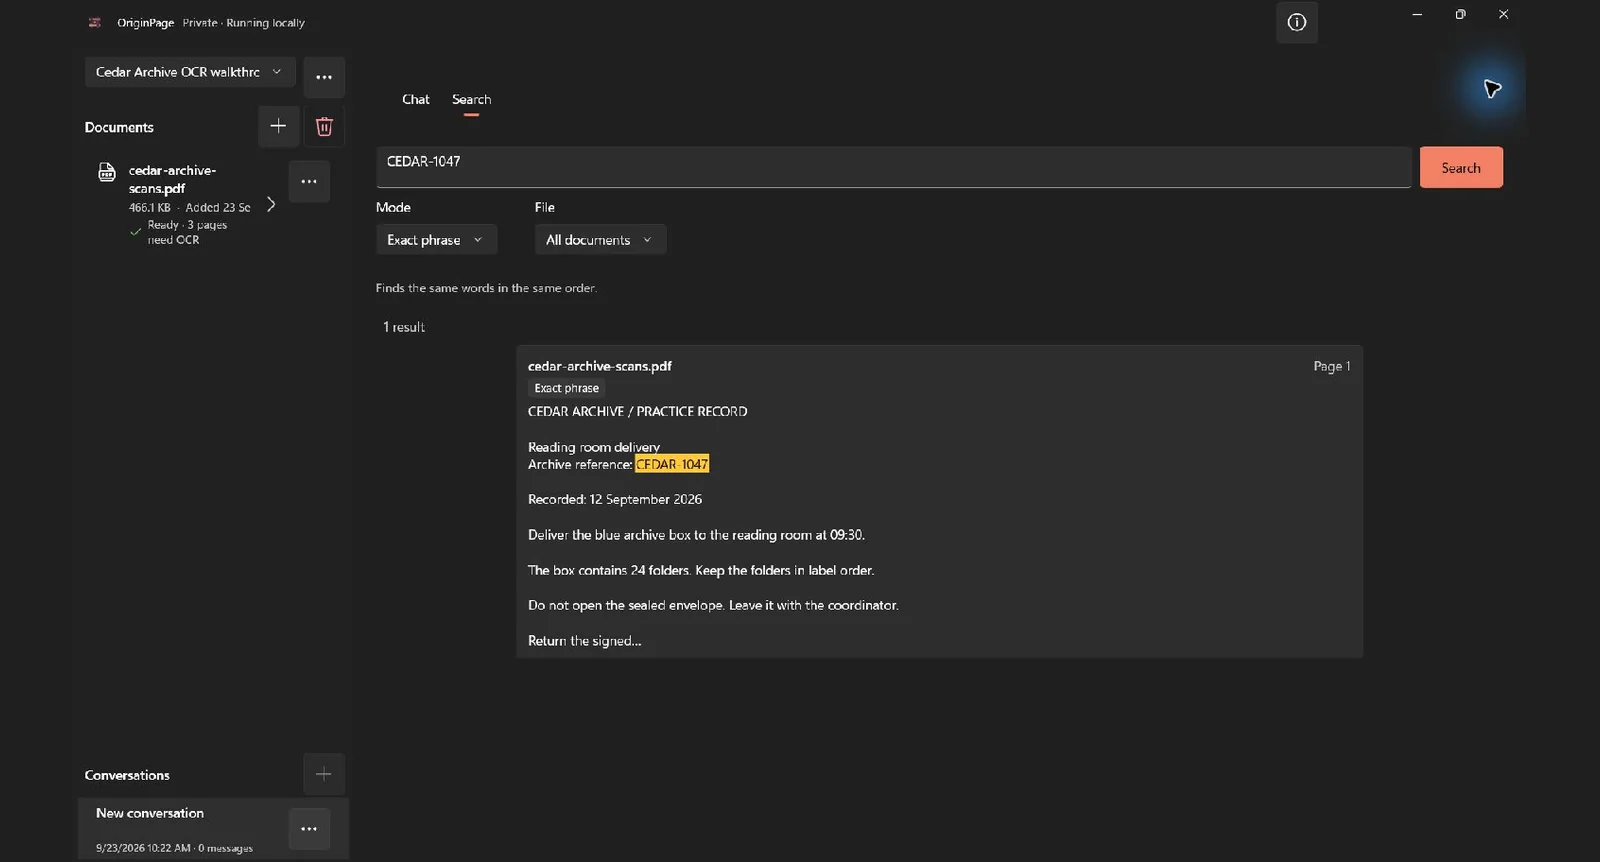
Open the result. Check the filename, page number, and full retained passage. The result preview truncates the receipt instruction; the source-context pane shows the complete 16:00 deadline.
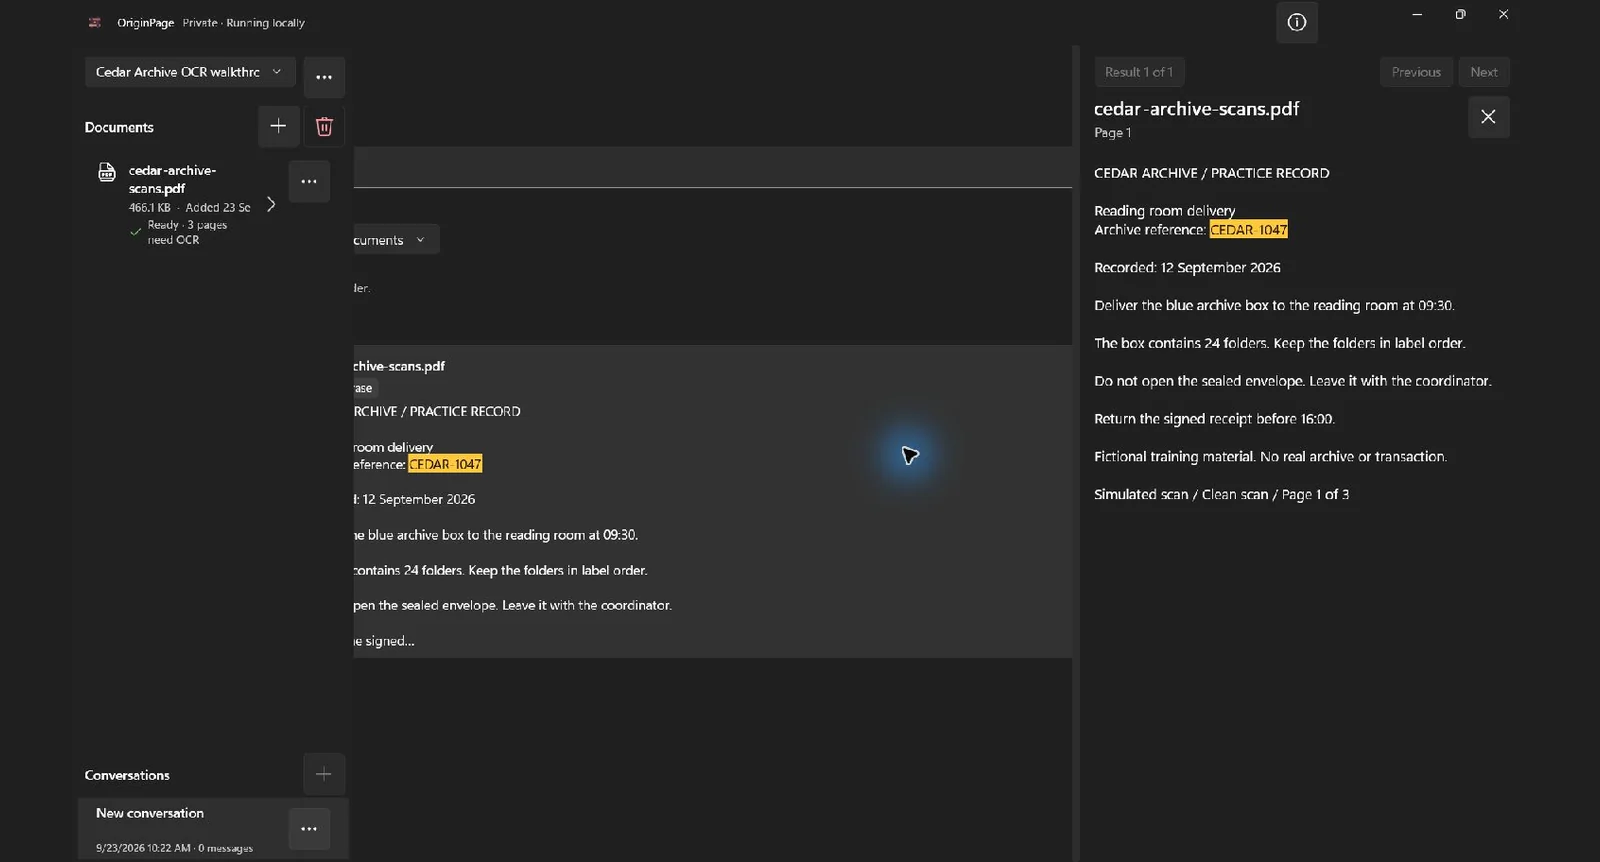
Use the original PDF to check visual details that text cannot establish. The retained context is recognized text, not independent proof that OCR read the image correctly.
Step 7: test an excluded page
Close the source pane. Replace the query with MAPLE-2086 and run the search again, keeping Exact phrase and All documents. Changing the field alone does not refresh the results.
Our second query returned zero results, even though the code had appeared correctly in page 2’s OCR review. We had excluded that page because other instructions were missing.
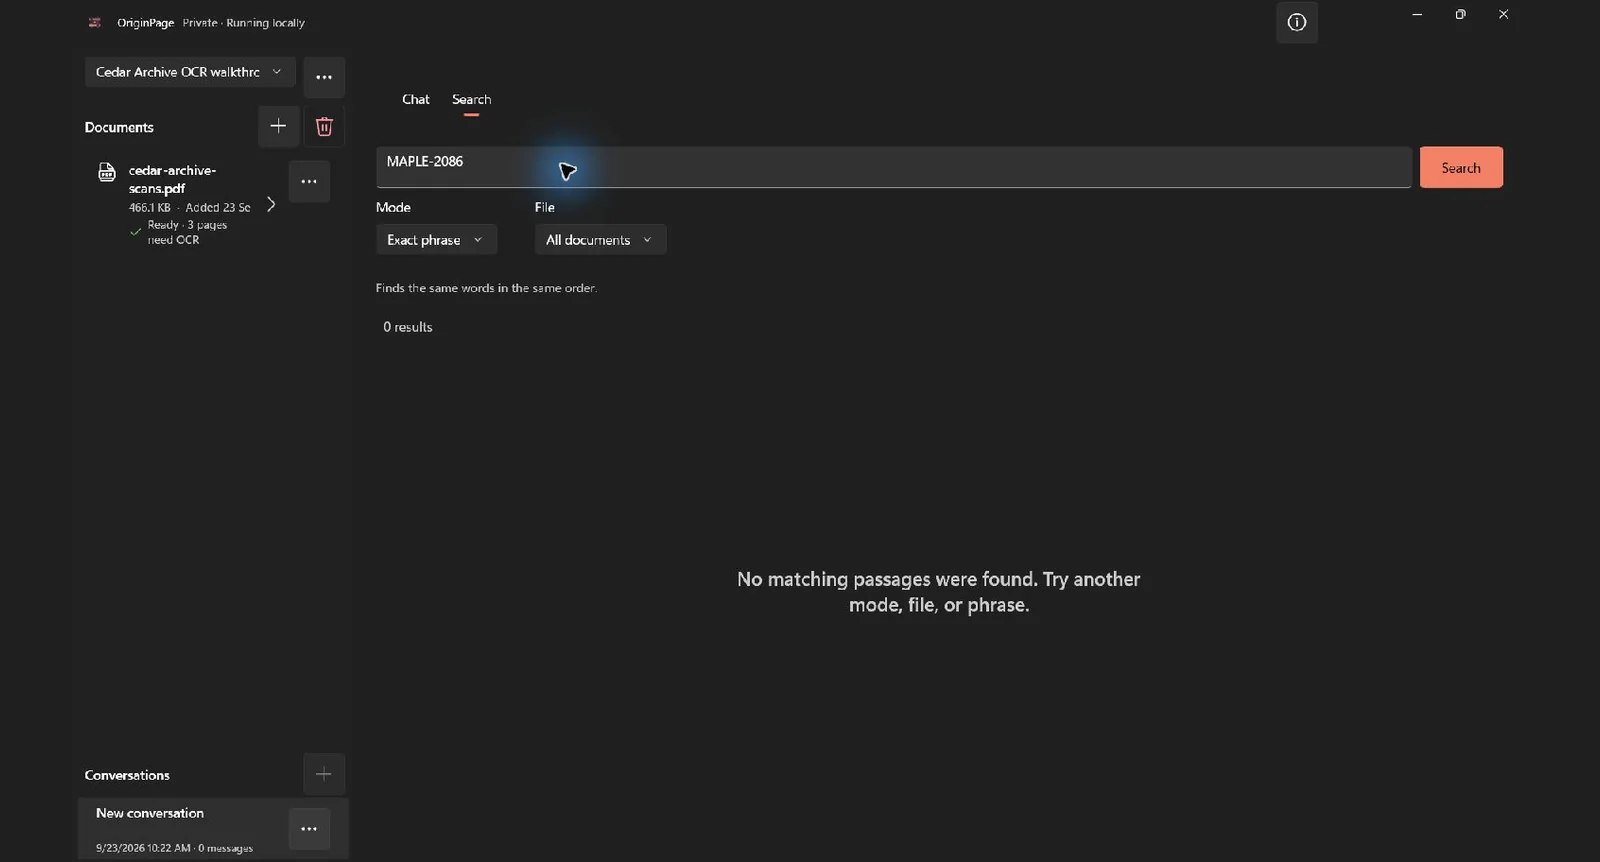
| Exact phrase query | Observed result | Interpretation |
|---|---|---|
CEDAR-1047 |
1 result, page 1 | Approved text was searchable |
MAPLE-2086 |
0 results | Excluded page text was not available to search |
In an unfamiliar collection, a miss could instead involve spelling, extraction, an unfinished review, or a file filter. Work through those possibilities before concluding that the original lacks the information. The multiple-PDF search guide explains wider collection searches.
When the scan needs another attempt
The words are wrong or missing. OCR text is read-only in this workflow. Obtain a better source scan, save it as a distinct PDF, and import it for a new review. Keep versions clearly named and search the intended file. Re-importing unchanged bytes does not repair the underlying image.
The page is tilted, faint, or blurry. Prefer a clearer original with straight text lines, even lighting, and legible characters. If you rescan, 300 dpi is a useful starting point: Tesseract’s documentation discusses resolution, noise, and straightening skewed text as factors in recognition quality. These are source-preparation suggestions, not image-editing controls inside OriginPage or a guarantee of correct output. Tesseract image-quality guidance
An identifier does not match. Compare characters and spacing directly. Look for 0/O, 1/I, missing hyphens, or inserted spaces. A shorter distinctive fragment can help locate retained text, but inspect the complete identifier before accepting the result.
You want to ask questions about the scan. First establish that the relevant text survived review. Switching to Semantic search or Chat cannot restore an omitted instruction. Once the evidence is usable, follow the offline PDF-chat walkthrough.
Keep a small review record
For each important scan, record the filename, page, checked facts, OCR problems, approval or exclusion decision, and a query used to verify the outcome. That makes a missing result explainable later.
Before relying on a scanned-document search:
- Inspect the recognized text against the original page.
- Check complete instructions, not just headings and identifiers.
- Resolve every required OCR page and finish review.
- Verify the retained text in the Ready document.
- Run a known-positive search and inspect its source context.
- Remember which pages were excluded when interpreting misses.
OriginPage’s ordinary document processing, reviewed OCR, indexing, and search run locally under the boundary described in its privacy statement. Windows and Microsoft Store services are outside the application process-tree claim. This capture session did not perform a new network-isolation test.
Method and reproducibility
Captured September 23, 2026 in the existing packaged OriginPage 1.0.35.0 candidate, app commit f73cec0c7da8, on Windows 11. We imported the actual downloadable PDF through the file picker into a dedicated fictional Workspace. No answer key was imported, and no OCR text, page decisions, or search results were inserted through a fixture or database script.
The PDF’s sample manifest records its SHA-256 hash and image-generation settings. The eight application screenshots document actual review and search states. Page previews and the social card are generated editorial assets. The low-quality page was downsampled, blurred, and made low contrast deliberately.
This is one observed run with three short, different records. It measures neither OCR accuracy across a document collection nor answer-generation quality. The displayed confidence and layout warnings, missing instructions, and persistent Ready-state warning are preserved rather than treated as successful recognition.